

Understanding Clinch Stud Hole Size Specifications
Clinch studs are essential fasteners in many industries. They secure components to sheet metal with precision. Understanding clinch stud hole size is crucial for successful installation.
The correct hole size ensures a strong, reliable joint. Using the wrong size can lead to weak connections and potential failures. This can compromise the integrity of the entire assembly.
Hole size charts are valuable tools for determining the right specifications. They help engineers and DIY enthusiasts make informed decisions. These charts consider factors like material thickness and stud type.
Proper installation of clinch studs results in a clean, flush finish. This is important for both aesthetics and functionality. It also ensures the longevity of the fastening solution.
In this guide, we will explore clinch stud hole size specifications. We will discuss their importance and how to determine the correct size. This knowledge is vital for anyone involved in precision engineering and fastening solutions.
What Are Clinch Studs and Why Hole Size Matters
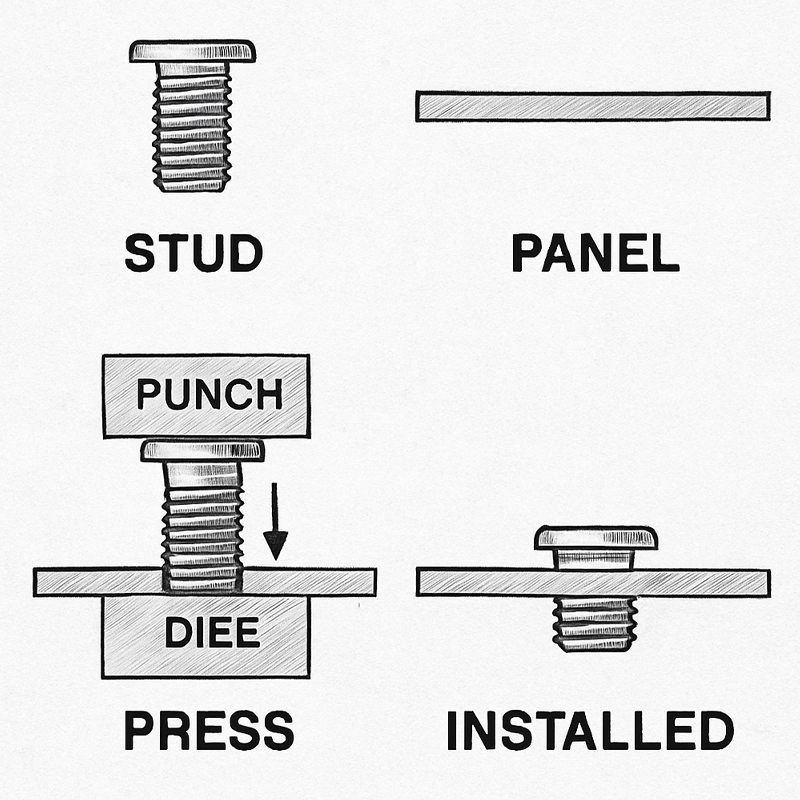
Clinch studs are a type of fastener commonly used in the automotive, aerospace, and electronics industries. They enable secure attachment of components to sheet metal, providing a permanent and robust solution. Their popularity stems from their ability to deliver strength while maintaining a flush surface.
The significance of hole size cannot be overstated. It is the key to ensuring that clinch studs perform optimally. An incorrect hole size can lead to a host of issues, such as misalignment and increased wear and tear. This ultimately affects the durability and reliability of the connection.
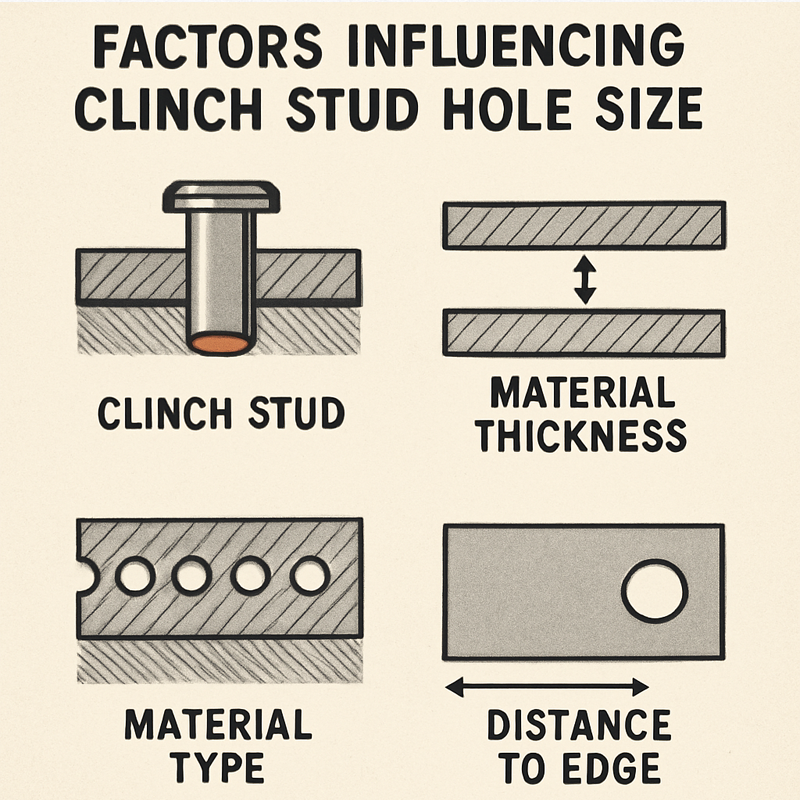
A precise hole size must accommodate several factors:
- Stud Shank Diameter: The hole must align with the stud’s shank.
- Material Type and Thickness: Different materials may require different hole sizes.
- Stud Type: Different types of studs, like self-clinching or press-fit, may need specific holes.
The correct hole size ensures that the clinch stud deforms appropriately during installation. This deformation is essential for achieving a secure fit and clean finish. By considering all factors, you can avoid common pitfalls and ensure a successful installation.
Key Factors Influencing Clinch Stud Hole Size
Understanding the key factors that influence clinch stud hole size is crucial for achieving effective results. The interaction between the stud, sheet metal, and installation method plays a vital role in determining the appropriate hole size. Each factor must be considered to ensure optimal performance and reliability.
Material thickness is a primary consideration. Thicker materials often require larger hole sizes to accommodate the necessary deformation during the installation process. Additionally, different materials may react uniquely, necessitating adjustments to hole size based on their properties.
Other factors to consider include:
- Type of Clinch Stud: Self-clinching vs. press-fit
- Installation Environment: Temperature and humidity may affect materials
- Load Requirements: Higher loads might necessitate larger hole sizes
Selecting the right clinch stud also impacts the hole size. Different applications, from lightweight to heavy-duty, will demand varying specifications. By accounting for these influencing factors, professionals can ensure the longevity and dependability of the fastening solution. Proper attention to detail will prevent issues and enhance the overall design.
How to Determine the Correct Clinch Stud Hole Size
Determining the correct clinch stud hole size involves several essential steps and considerations. Precision in hole size ensures a strong and reliable fastening system. It’s imperative to follow structured guidelines to avoid mistakes.
First, consult the manufacturer’s specifications. These documents provide detailed recommendations and ensure compatibility between the stud and hole size. It’s a starting point that’s often overlooked.
Measuring tools are also crucial. Accurate calipers can help confirm the shank diameter, ensuring the hole size is just right. Sometimes, even small miscalculations can lead to fitting issues.
Important steps include:
- Review Manufacturer Guidelines: Vital for compatibility
- Use Accurate Measurement Tools: Ensures precision
- Consider Material Properties: Adjust size if needed
Lastly, testing is an invaluable part of the process. Conducting a dry run or using test samples allows for verification before full-scale production. This step saves time and resources, preventing costly errors. Through careful consideration and methodical approach, the correct hole size can be determined efficiently.
Clinch Stud Hole Size Chart: Reference and Usage
A hole size chart is an invaluable tool for anyone working with clinch studs. It provides quick access to the correct sizes needed for various applications. These charts simplify the selection process.
Using the chart correctly involves understanding its layout. Typically, it lists clinch stud diameters alongside corresponding hole sizes. This ensures easy cross-referencing during design and installation.
Key advantages of using a hole size chart include:
- Quick Reference: Saves time during selection
- Standardization: Ensures uniformity in installations
- Error Reduction: Minimizes risk of incorrect sizing
It’s worth noting that relying solely on these charts might not cover all scenarios. Material thickness and type must also be factored in. Engineers and installers should consider environmental conditions and specific load requirements when using the chart. By combining chart data with practical insights, users can achieve reliable and effective fastening results. This balanced approach leads to improved product performance and reduced installation errors.
Common Mistakes and How to Avoid Them
Mistakes in clinch stud installations often stem from incorrect hole sizing. Using the wrong size can compromise the joint’s integrity. This issue is more prevalent in high-stress applications.
Another common error is disregarding material compatibility. Different materials require different hole sizes for optimal results. Ignoring this can lead to improper installations.
To prevent these issues, consider the following steps:
- Measure Accurately: Use precise tools to gauge the hole size.
- Consult Charts: Always refer to updated hole size charts.
- Consider Material: Adjust hole sizes based on material type and thickness.
Incorporating these strategies helps maintain the quality of the installation. By being vigilant and thorough, you can ensure robust and reliable connections. Proper attention to detail is key in avoiding common pitfalls.
Best Practices for Installation and Inspection
For secure clinch stud installations, following best practices is essential. Proper installation ensures the stud sits flush against the surface. This approach provides a clean, professional finish.
Regular inspection helps identify any potential issues. Catching problems early can prevent bigger failures. Make inspections a routine part of maintenance.
Consider these installation and inspection tips for quality assurance:
- Use Appropriate Tools: Employ tools designed for precise stud installation.
- Verify Alignment: Ensure proper alignment before securing the clinch stud.
- Check Flushness: Confirm the stud is flush with the surface for a clean look.
Adhering to these best practices enhances the reliability of your fastening solutions. Staying vigilant during the installation process can prevent costly repairs later. Precision and care are paramount in achieving lasting results.
Conclusion: Ensuring Precision and Reliability
Understanding clinch stud hole size specifications is vital for robust fastening solutions. Proper sizing ensures strength and prevents failures. Attention to detail during installation enhances longevity and reliability.
By adhering to guidelines and best practices, you create dependable and efficient connections. Precision in each step leads to successful outcomes in both industrial and DIY projects.
