
Understanding Clinch Stud Hole Size Specifications
Clinch studs are essential in fastening solutions, especially for attaching components to thin metal sheets. Understanding clinch stud hole size specifications is crucial for ensuring a secure and reliable fit. The right hole size can prevent potential failures and enhance performance. This guide will explore the importance of clinch stud dimensions and how to determine the correct hole size. Whether you’re an engineer, manufacturing professional, or DIY enthusiast, mastering these specifications is key to successful installations.
What Is a Clinch Stud?
A clinch stud is a type of fastener designed to attach components to thin metal sheets. These fasteners are integral in precision engineering and provide a robust connection between parts.
Clinch studs are commonly used in electronic enclosures, automotive panels, and industrial equipment. Their design allows for easy installation and a strong, lasting bond.
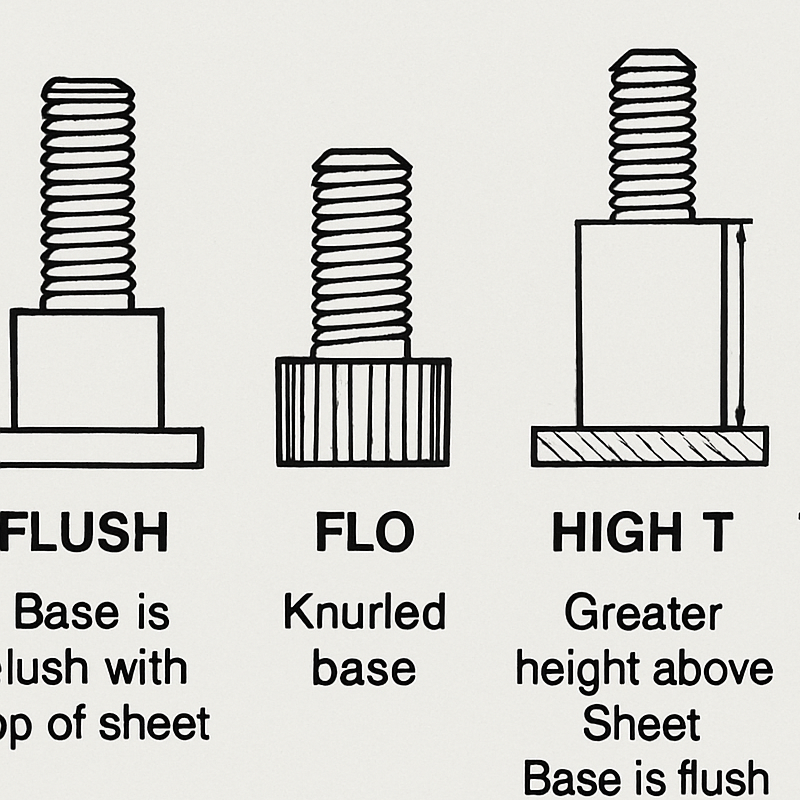
Key features of clinch studs include:
- Threaded stud
- Knurled body or flange
- Self-clinching design
Proper installation involves pressing the stud into a pre-made hole to ensure it stays securely in place.
Why Clinch Stud Hole Size Matters
The correct clinch stud hole size is critical for a secure and functional installation. A precise fit ensures that the stud does not loosen over time.
Incorrect hole sizes can lead to several issues, including:
- Poor fastening strength
- Increased wear and tear
- Potential system failures
Ensuring the correct hole size is crucial for the longevity and reliability of the fastened components.
Materials, thickness, and stud type all influence the required hole dimensions. Adhering to the proper specifications helps avoid costly repairs and replacements.
Key Clinch Stud Dimensions and Terminology
Understanding clinch stud dimensions is essential for proper installation. These measurements ensure a fit that meets specific engineering requirements.
Several key terms are associated with clinch studs:
- Diameter: The width of the stud.
- Length: The full span of the stud from end to end.
- Thread Size: The measurement of the thread’s thickness.
Each component of the clinch stud plays a pivotal role in its functionality. Accurate dimensions guarantee a secure application.
These measurements vary depending on the application and materials used. Always refer to manufacturer guidelines for precise specifications.
Industry standards provide a benchmark for uniformity. Following these ensures compatibility across different projects and applications.
How to Determine the Correct Clinch Stud Hole Size
Determining the correct clinch stud hole size is vital for a secure fit. It starts with understanding the sheet metal’s thickness.
The type of material also plays a significant role. Metals vary in ductility and hardness, which affects the necessary hole size.
Industry standards are a reliable guide. Refer to tables or software tools for specific dimensions. This minimizes errors.
Using a pilot hole aids precision in hole placement. It serves as a guide, reducing the chance of misalignment.
Measure twice, cut once. Tools like calipers or micrometers are crucial for verifying dimensions. Always prioritize accuracy for best results.
Steps to determine the correct size include:
- Assess material thickness.
- Check industry standards.
- Drill a pilot hole.
- Measure with precision tools.
Clinch stud installations demand precision. Getting the hole size right ensures lasting performance.
Industry Standards and Manufacturer Guidelines
Industry standards are the foundation for precise clinch stud installations. These guidelines ensure consistency and reliability in fastening applications.
Manufacturers like PEM provide detailed specifications. Their guidelines cover hole sizes for various stud types. Checking these can prevent installation errors.
Here’s what to consider:
- Material compatibility.
- Specific dimensions for different stud styles.
- Environmental and load conditions.
Following these standards is crucial in industrial settings. Adherence ensures the integrity of the fastening system and promotes long-term reliability in applications. Always consult the manufacturer’s documentation for the most accurate information.
Step-by-Step Guide to Preparing and Measuring Holes
Accurate preparation of holes is vital for effective clinch stud installation. Precision in this step prevents complications and ensures a robust fit.
Start by selecting the correct drill bit size. This ensures the hole diameter matches the stud specifications. Measure the thickness of the metal sheet before drilling.
Use a punch to mark the hole locati0n. This helps guide the drill bit and ensures accuracy. Be cautious to avoid any misalignment during this step.
Consider the following steps for preparing holes:
- Choose the correct drill bit.
- Punch the hole center.
- Drill with steady pressure.
- Measure the hole with calipers or micrometers.
After drilling, deburr the hole to eliminate sharp edges. This step is critical as it allows the stud to sit flush with the metal surface. Always verify hole dimensions after preparation to confirm precision.
Common Mistakes and How to Avoid Them
Mistakes during clinch stud installation can lead to failure. One common error is using incorrect hole sizes. This affects the grip and strength of the fastening. Always verify the size before drilling.
Another mistake is improper alignment. Misaligned holes compromise the stud’s functionality. Always double-check the alignment before installation.
To prevent these issues, remember to:
- Verify hole dimensions multiple times.
- Ensure proper alignment with guides.
- Use the right tools to achieve precision.
Tips for Successful Clinch Stud Installation
For a perfect clinch stud installation, preparation is key. Ensure the workspace is clean and organized. This helps prevent errors and improves efficiency. Proper lighting also aids in precision.
Choosing the right tools is crucial for success. High-quality tools will ensure accurate installation. Additionally, follow manufacturer guidelines closely for best results.
Consider these tips:
- Maintain a tidy work area.
- Use quality tools and equipment.
- Adhere to manufacturer instructions without deviation.
Conclusion: Ensuring Precision in Clinch Stud Applications
Precision is vital in clinch stud applications, influencing both performance and durability. By understanding hole size specifications, you safeguard against potential failures. Each step of the process, from selecting tools to following guidelines, plays a crucial role.
Investing time in proper training and maintenance will enhance installation success. Remember, using the right clinch stud dimensions ensures the longevity of your fastenings. Embrace technology and continually update your skills to stay competitive. Consistency in following best practices will yield great results in your fastening projects.
